[:en]
This document describes the methods of logging from VS clients. In general, you could get the logs with USB device or debug tool. There are 2 methods to get logs from VS clients:
- Using Debug Tool via PuTTy: This section includes the connections between debug tool and VS and the logging process through PuTTy.
- USB Logging: In this section, it is explained how to get log from VS client with the help of USB.
Using Debug Tool via PuTTy
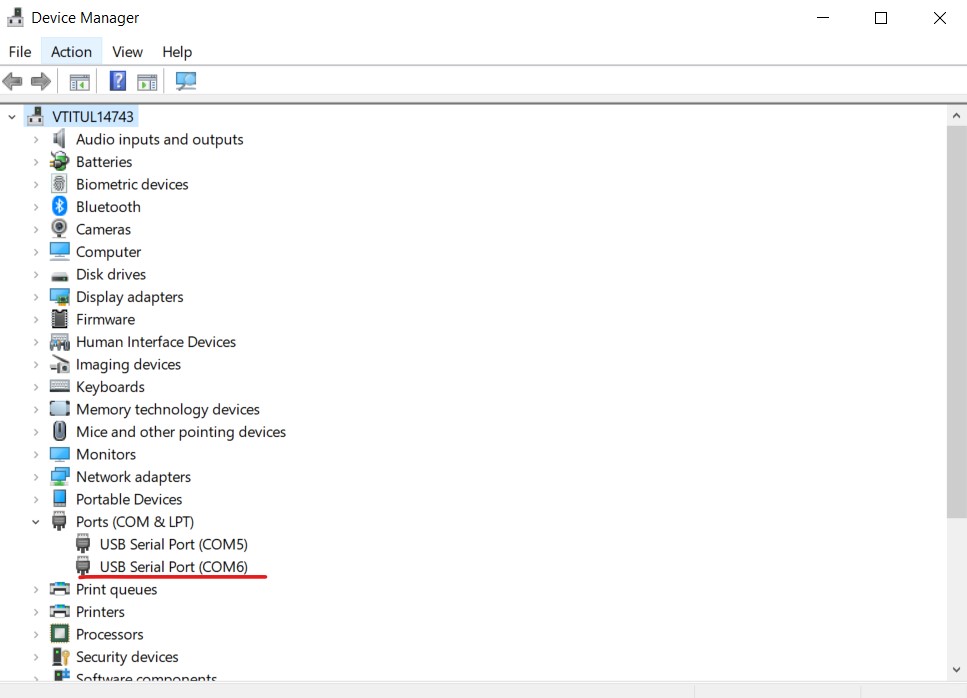
In order to get logs using the debug tool, you must first download the PuTTy program. After the program is installed, USB port of the debug tool must be connected to the computer and the VGA, SerialPort, or Scart must be connected to the VS client. You could see the number of COM ports you can use on Device Manager after the connections are completed as shown in Figure 1.
[:fr]
Ce document décrit les méthodes de journalisation pour les clients VS. En général, vous pouvez obtenir les journaux avec un périphérique USB ou un outil de débogage. Il existe 2 méthodes pour obtenir les journaux des clients VS :
- Utilisation de l’outil de débogage via PuTTy : Cette section inclut les connexions entre l’outil de débogage et VS, et le processus de journalisation via PuTTy.
- Journalisation USB : Dans cette section, nous expliquons comment obtenir le journal du client VS à l’aide d’une clé USB.
Utilisation de l’outil de débogage via PuTTy
Pour obtenir des journaux à l’aide de l’outil de débogage, vous devez d’abord télécharger le programme PuTTy. Une fois le programme installé, le port USB de l’outil de débogage doit être connecté à l’ordinateur, et le port VGA, SerialPort ou Péritel doit être connecté au client VS. Vous pouvez voir le nombre de ports COM que vous pouvez utiliser sur le Gestionnaire de périphériques une fois les connexions terminées, comme illustré en Figure 1.
[:]
[:en]
Figure 1: COM Port on Device Manager
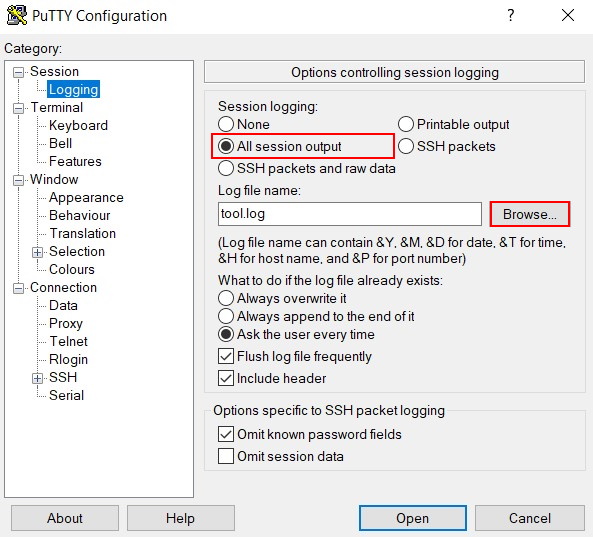
After PuTTy is run for logging operations. First, the log file must be created in the “Logging” tab with the same configuration as shown in Figure 2. And, with the Browser button appearing in a red box, you can choose where to save the file.
[:fr]
Figure 1: Port COM sur le Gestionnaire de périphériques
Après exécution de PuTTy pour les opérations de journalisation. Tout d’abord, le fichier journal doit être créé dans l’onglet « Journalisation » avec la même configuration que celle illustrée en Figure 2. Ensuite, avec le bouton Parcourir apparaissant dans une zone rouge, vous pouvez choisir où enregistrer le fichier.
[:]
[:en]
Figure 2: Creating a log file
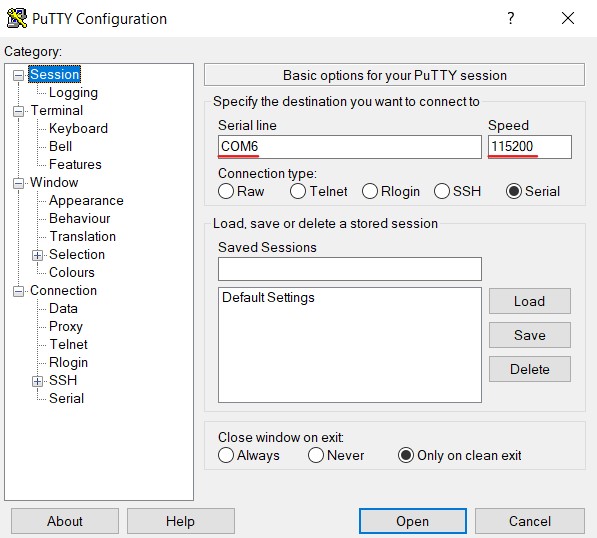
After that, you should write the COM port information in the Host Name field and enter the Port information as 115200 as shown in Figure 3. And also, Connection type should be selected as “Serial”.
[:fr]
Figure 2: Création d’un fichier journal
Après cela, vous devez écrire les informations du port COM dans le champ Nom d’hôte, et les informations de Port sous la forme 115200, comme illustré en Figure 3. Le Type de connexion doit être configuré sur « Série ».
[:]
[:en]
Figure 3: COM Port Information
Logging operations are started by clicking the “Open” button shown in Figure 3. You can find the log file in the path you created in Figure 2.
USB Logging
In order to get logs with USB, you must first have a USB memory in FAT32 format. Following steps should be performed respectively to set a USB device to FAT32 format:
- Right click on the USB device,
- “Format” sekmesi seçilir.(Figure 4),
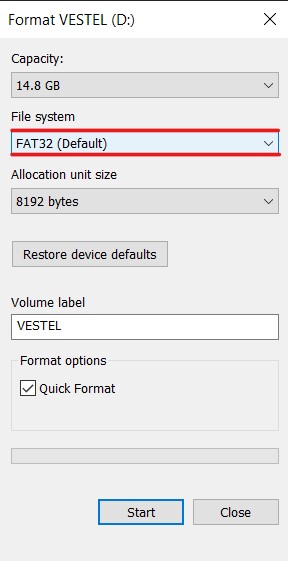
- In the window that opens, “File System” is selected as FAT32 and started(Figure 4).
[:fr]
Figure 3: Informations sur le port COM
Les opérations de journalisation sont lancées en cliquant sur le bouton « Ouvrir » illustré en Figure 3. Vous trouverez le fichier journal au chemin que vous avez créé comme sur la Figure 2.
Journalisation USB
Afin d’obtenir des journaux avec une clé USB, vous devez d’abord disposer d’une clé USB au format FAT32. Les étapes suivantes doivent être effectuées dans l’ordre pour configurer un périphérique USB au format FAT32 :
- Faites un clic droit sur la clé USB.
- L’onglet « Formater » est sélectionné (Figure 4).
- Dans la fenêtre qui s’ouvre, le système de fichiers FAT32 est sélectionné et le formatage démarre (Figure 4).
[:]
[:en]
Figure 4: USB FAT32 Format
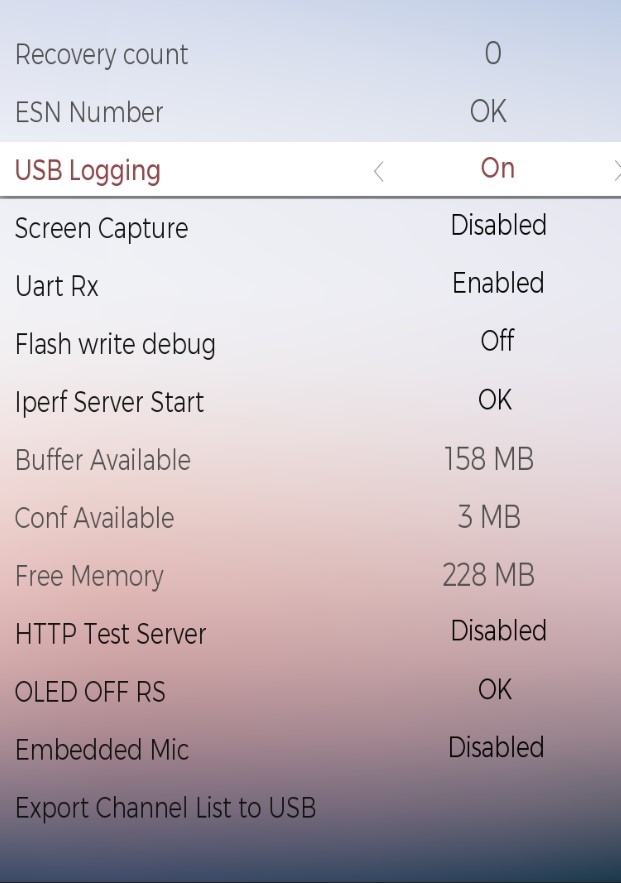
After the above operations, the USB device is plugged-in to the VS. The “USB Logging” is activated under the Diagnostics tab in the Service Menu as shown in Figure 5.
Note: After USB Logging has been activated, the VS client must be restarted.
[:fr]
Figure 4: Format USB FAT32
Après les opérations ci-dessus, la clé USB est connectée au VS. La Journalisation USB est activée sous l’onglet Diagnostics dans le Menu Service, comme le montre la Figure 5.
Remarque : Une fois la journalisation USB activée, le client VS doit être redémarré.
[:]
[:en]
Figure 5: USB Logging
[:fr]
Figure 5: Journalisation USB
[:]


