This documentation is designed to demonstrate Digiguest IP Software installation for MB230 model Vestel TVs. It can be used as a user manual and it provides a step by step installation guidance for Digiguest IP Software. It will be being updated as the new functionalities and specifications get added.
NOTE: Do not start Digiguest installation before completing SQL Server and IIS installations. Otherwise, it will result in installation not to be completed or Digiguest to run improperly.
Refer to the links below if you don’t have SQL Server and IIS installed;
If you are done with the installations required beforehand, run “HtmlHotelTV_vX.XX.X.msi” setup file and select the installation folder for Digiguest IP.
Installation folder name must be unique under “wwwroot” path. For that reason, previous installation files must be removed. For convenience, default folder name is chosen to be “HtmlHotelTV_vX.XX.X” to prevent any name conflict.
Then click next (Figure 1).
As mentioned in the previous sections, SQL Server 2012(as a lowest version of SQL Server) must be installed prior to the Digiguest IP installation in case it does not exist on Digiguest IP installation server. SQL Server version must be minimum of 2012. Higher versions are suitable for Digiguest IP as well.
To obtain connection details for SQL Server, start SQL Server installed in your system (Figure 2). “Server name” field specifies which database server you want to connect to. If express version of SQL Server is installed, Server name will appear as “192.168.X.XXX\SQLEXPRESS”. Choose “Authentication” as SQL Server Authentication and enter your credentials chosen when installing SQL Server. Click connect and make sure that a connection can be established.
Information required to make the connection between Digiguest IP and SQL Server must be copied (Figure 3). If you are able to connect to the SQL Server successfully provide these connection details in Digiguest IP Setup. It will allow Digiguest IP to connect to the database.
“Database Server” field should be same with “Server name” in SQL Server “Connect to Server” window. If SQL Server and Digiguest IP are running on the same machine, instead of entering “192.168.X.XXX\SQLEXPRESS” you can enter “.\SQLEXPRESS”. “User Name” and “password” fields must be filled with your credentials. It is also recommended to choose a database name which does not exist in your SQL Server. If default database name is suitable for you, then leave it as it is. This will make Digiguest IP Setup to create a brand new database for Digiguest IP .
After entering SQL Server specifications, click “Next” to go to Registration window.
A Registry Key is required in order to activate Digiguest IP. Otherwise, Digiguest IP will not start. Registery Key will be provided by Vestek Support Team. Please, contact support team for further details.
If the Registry Key is obtained, enter the key in “Registry Key” field.
IIS Virtual Directory must be unique. Default name is chosen to be “CloudhotelTV_vX.XX.X” (Figure 4).
NOTE: If you wish to cancel installation process, click “Cancel” button. You may as well make changes, use “Back” button to change any installation specifications for this purpose (Figure 5).
Figure 5: Installation Confirmation
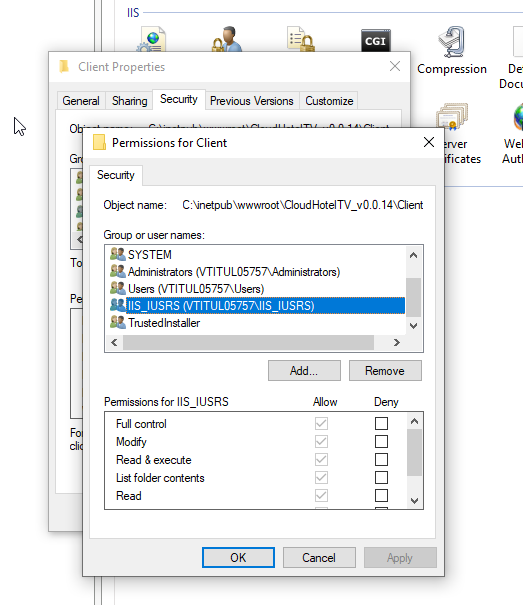
Administrator privileges for IIS user(IIS_IUSRS) should be given to “C:\inetpub\wwwroot\CloudhotelTV_vX.XX.X” folder. To edit permission of the application folder, start IIS and find the “CloudhotelTV_vX.XX.X” application on the left side of the IIS window. Click “Right” on the application name and select “Edit Permissions” (Figure 6). Then navigate to the “Security” tab and click “Edit”. Choose the user to give access to or add a new user type and configure the permissions for that user (Figure 7).
Figure 6: Digiguest IP Accessing Application Permissons Window

Figure 7: User Permissions
After the permission processes are completed, if you see the application via IIS as in Figure 8 and browse it, the application will open in the browser. If you see this screen, the installation is complete.
Figure 8: Application on IIS
The Digiguest application will first welcome you with the “room registration” section as shown in Figure 9. After that, you should visit Client Setup Guide document.
Figure 9: Digiguest First Run

