VBoard Smart Board Platform is designed for use in education and corporates. It is featuring wide range of whiteboarding and collaboration tools like WhiteBoard and wireless screen sharing. VBoard Smart Board Platform consists of Account Management System (AMS) and Interactive Flat Panels (IFPs)
AMS is a web server keeping all user and device information and has a web UI accessible for users any time. In case IFPs are configured to be used in sync with AMS, each user can access the same content on any IFP.
Account Management System Dashboard
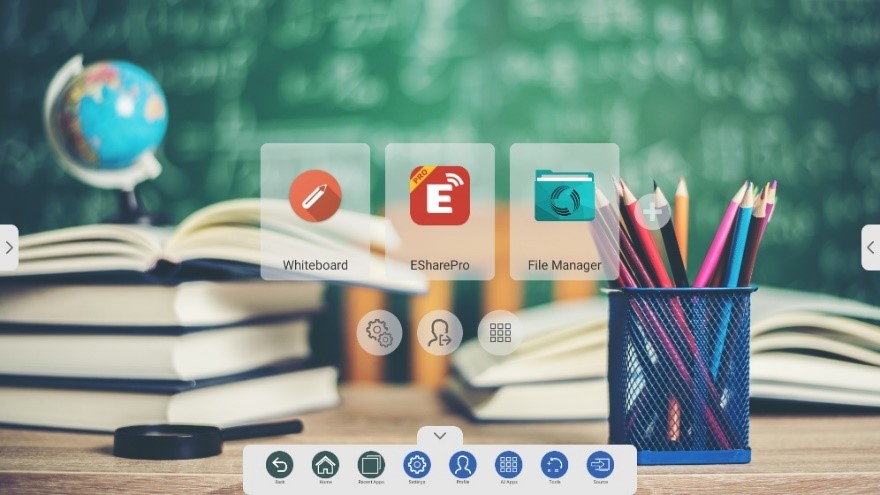
VBoard IFP - Home Screen
IFPs are based on Android operating system. Users are required to login for using IFP features.
IFPs can be configured to work in one of the following operation modes.
AMS passive
AMS active
In case IFPs are configured to be in sync with AMS, a user can access the same content on any IFP registered to same AMS.
Account Management System is based on following concepts:
Groups
Users
Displays
USERS
All users access AMS using a web browser. They are identified by a username and password to access AMS. There are two types of user roles in AMS in terms of the privileges that users have, Super Admin and User.
Super Admin
Super Admins can access all pages in AMS and edit all content. The first user created during AMS installation is a Super Admin.
User
Users can only access their own content and AMS pages.
DISPLAYS
Displays represent Android OS based IFPs. Each Display registered to AMS is individually identified by AMS.
GRUPLAR
They are groups that are created in a hierarchical structure and that enable all registered users and screens to be classified within this structure. They provide easy screen and user tracking.
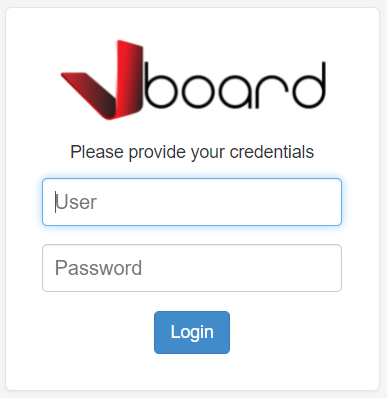
LOGIN
The AMS is protected by an authentication system that requires a user name and password.
During AMS installation a user name and password is created which grants unrestricted access to all contents. This account belongs to administrator.
The user enters the URL of the AMS in any web browser and as a result of this action, the following login page opens.
AMS Login
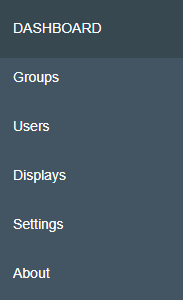
NAVIGATION MENU
All AMS pages are accessible from the AMS Main Menu. This menu is placed vertically on the left hand side of all AMS pages.
Navigation Menu
AMS page links in the navigation menu are:
Dashboard (Homepage)
Groups
Users
Displays
Settings
About
Super User can access all links. Standard User can only access Home, Users and About pages. A standard user can only access their own information on the Users page.
DASHBOARD
After Log In, the dashboard page is opened. This page is homepage of the user. Each user is assigned a homepage. There are three alternatives for dashboard:
Status Dashboard
Icon Dashboard
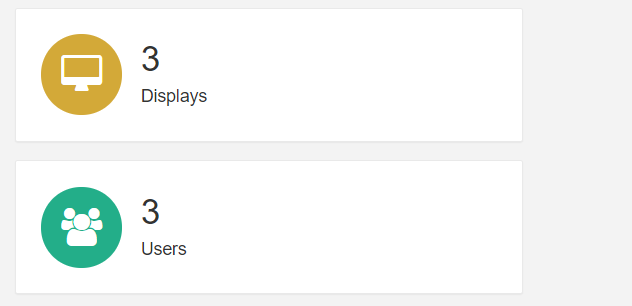
STATUS DASHBOARD
The Status Dashboard is intended as a high-level view of the system for super admin type users.
Status Dashboard
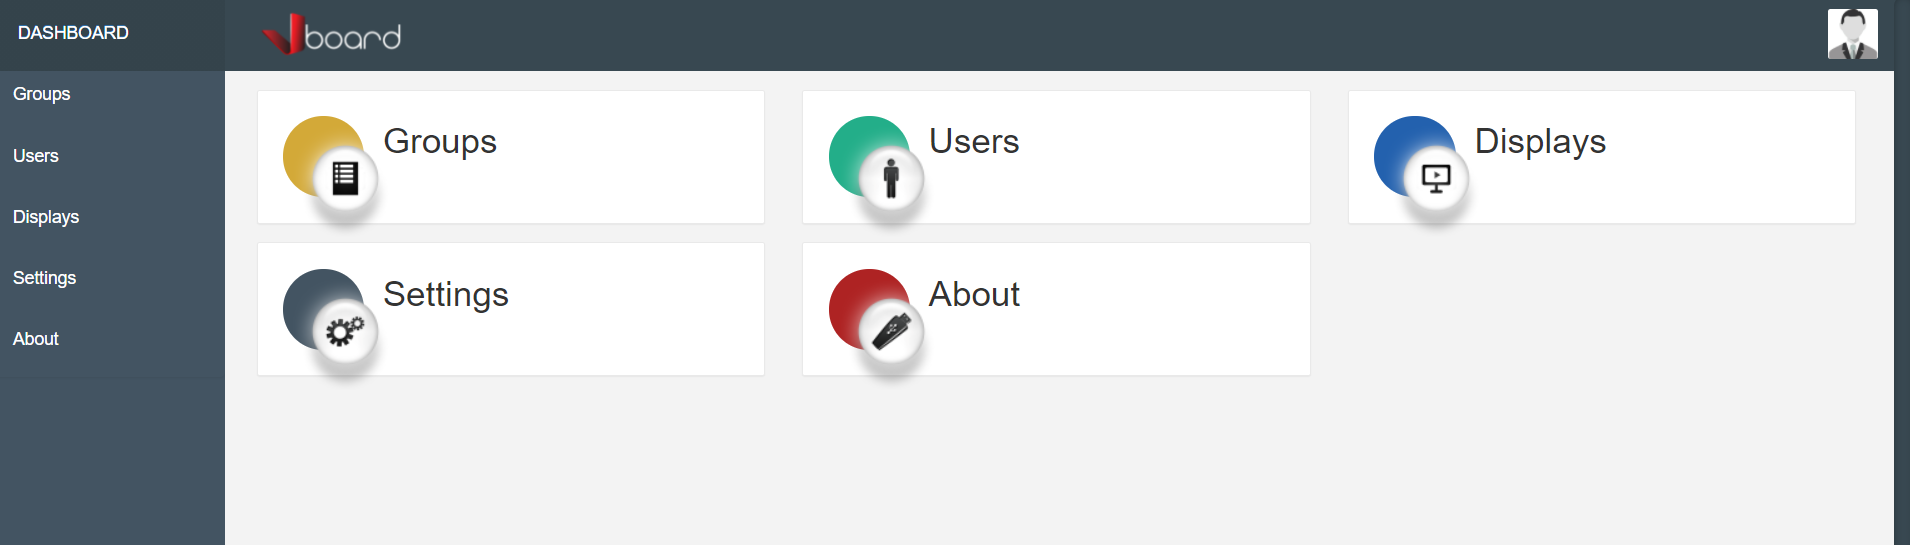
ICON DASHBOARD
The Icon Dashboard is intended as a “Launcher” into other areas of the system. The icons in the dashboard are shown / hidden according to the menu permissions of the user. The Icon Dashboard is the default dashboard for all new users.
Icon Dashboard
GROUPS
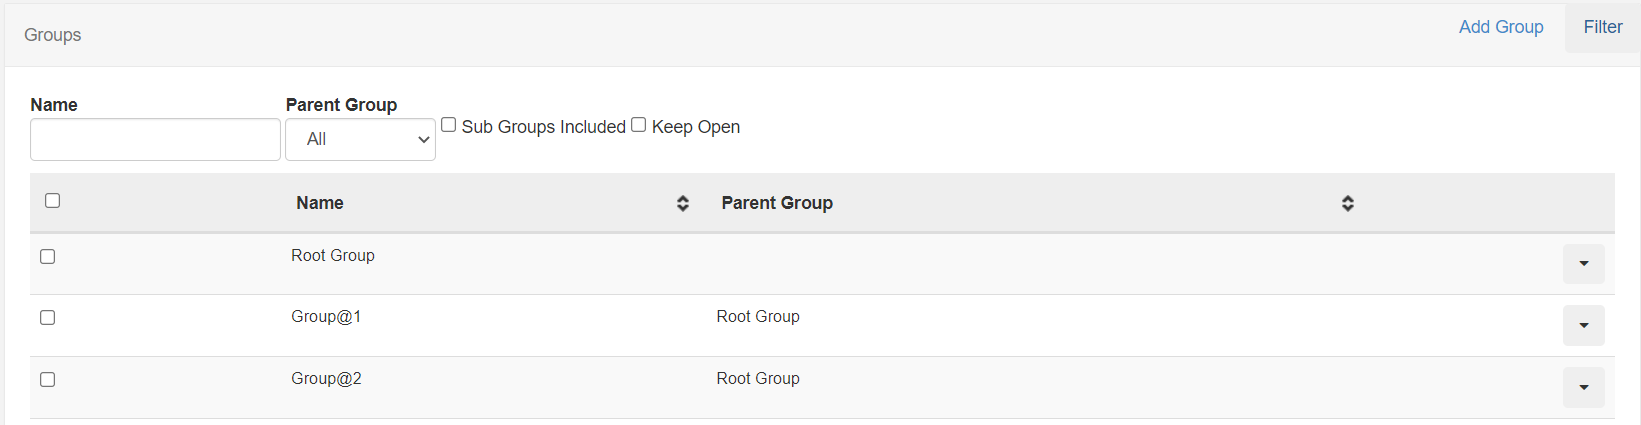
A list of groups registered to the AMS is displayed on the Groups page. The groups are created in a hierarchical structure. All other groups are defined as belonging to a parent Group, except for the top Group defined in the first installation. Only Super Admin users can view this page.
The Groups page is accessed via the Groups tab in the AMS navigation menu.
Groups Page
There are following columns in the table:
Name: Name given to the group
Parent Group: Parent Group of which it is a member
FILTER GROUPS
The Group list can be filtered on the Groups Page. To filter the groups, the “Filter” menu in the action menu located at the upper right corner of the page is used. The filtering options are:
Name: Filters by display name
Parent Group: Filters by the Group of which it is a member
Including Subgroups: Lists with all subgroups belonging to the selected parent group
Keep On: To keep filter options always visible on the page.
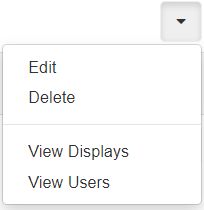
GROUP ROW MENU
The operations that can be made for each Group are accessed via Row Menu button at the end of the row.
Group Row Menu
The operations that can be performed via the Row Menu are:
Edit: Opens Group Edit form
Delete: Opens group deletion form
View Displays: Shows Displays registered to the Group
View Users: Show Users registered to Group
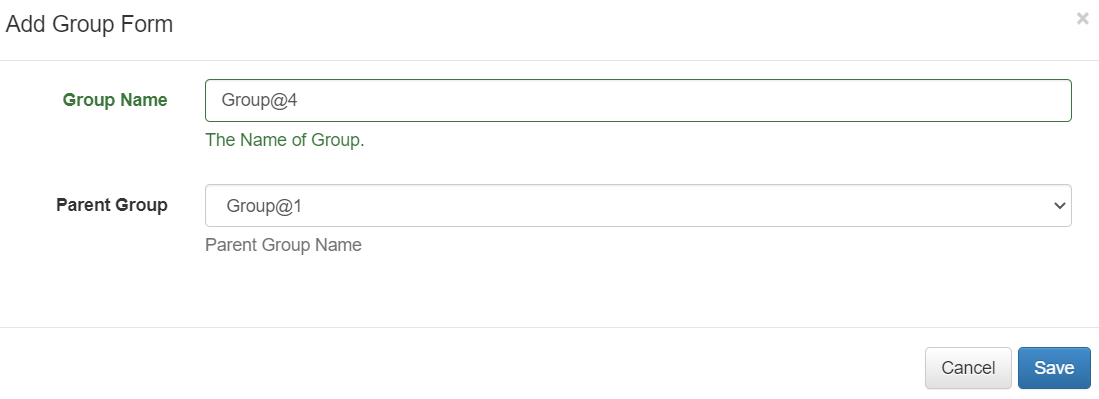
ADD GROUP
The Add Group form can be accessed through the “Add Group” menu in the Action menu located at the top right corner of the Groups page. Only Super Admins can do this action.
Add Group Form
The Add Group form contains editable fields for the following properties.
Group Name: The name defined to the group
Parent Group: Name of the Parent Group to which the group belongs
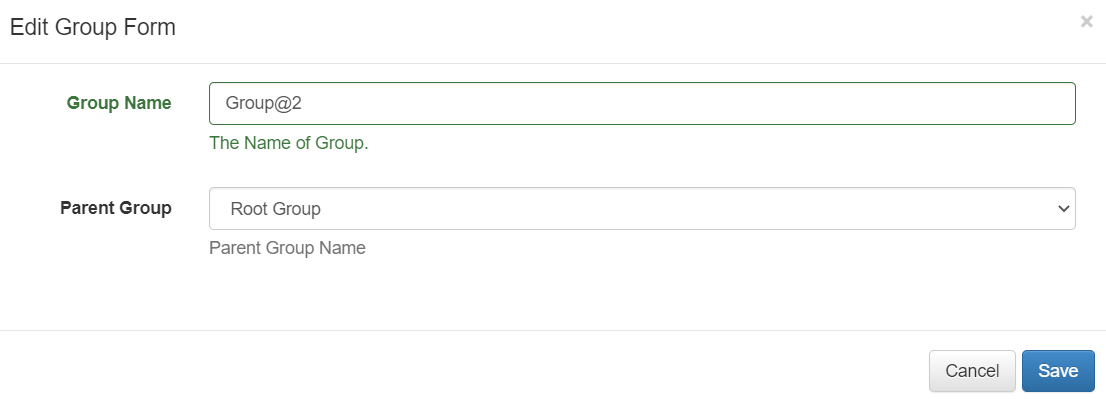
EDIT GROUP PROPERTIES
The Edit Group form is accessed through the “Edit” menu in the row menu of the Group in the table on the Groups page.
Edit Group Form
The Edit Group form contains editable fields for the following properties.
Group Name: The name defined to the group
Parent Group: The name of the Parent Group to which the group belongs
DELETE GROUP
The Delete Group form is accessed through the “Delete” menu in the row menu of the Group in the table on the Groups page. Except for the root Group, other Groups can be deleted.
USERS
A list of users registered to the AMS is displayed on the Users page. Registered users can log in to the IFPs or AMS.
The user logs in with his username and password on IFP. IFP connects to the AMS and if the identity is verified, the user is logged in and the user’s information becomes active on IFP.
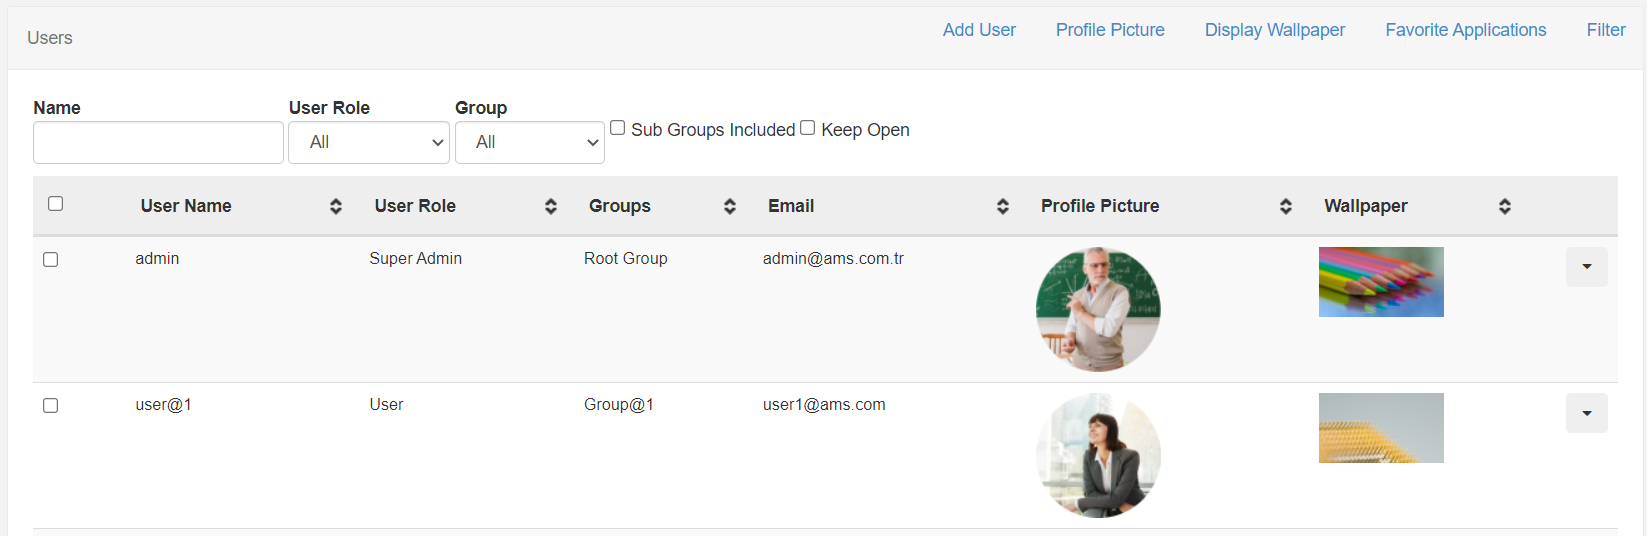
The Users page is accessed via the Users tab in the AMS navigation menu. This page lists the users that the user is authorized to see. After first installation, a “Super Admin” is listed by default.
Users Page
There are following columns in the table:
Name: Username
User Role: User type (Super admin, User)
Groups: Members of Groups
Email: The user’s email address
Profile Picture: Preview of the user’s profile picture
Wallpaper: A preview of the wallpaper for the user’s IFP screen.
FILTER USERS
The user list can be filtered on the Users Page. To filter users, the “Filter” menu in the action menu located at the top right corner of the page is used. The filtering options are:
Name: Filters by username
User Type: Filters by user type (Super admin, User)
Group: Filters by the Member Group
Keep On: To keep filter options always visible on the page.
USER ROW MENU
Operations that can be performed for each User are accessed via the Row Menu at the end of the row. Only the super admin can view the row menu of other users.
User Row Menu
The operations that can be performed via the Row Menu are:
Edit: Opens user edit form to set the options for user
Delete: Opens user deletion form
Groups: Assigns User to one or more Groups
Profile Picture: Assigns a Profile Picture to be displayed on IFP
Screen Wallpaper: Assigns the wallpaper to be displayed on IFP
Favorite Applications: Selects Favorite Applications to be displayed on IFP
Password: Changes User Password
Lock Password: Changes User’s Screen Lock Password for IFP
USER ACTION MENU
On the Users page, there are shortcuts for the actions that the active logged in user can do in the Action menu. The action menu is in the upper right corner of the page. The actions that can be done with the action menu are:
Add User: Adds a new user. Only super admin can do this action
Profile Picture: (For active user) Assigns Profile Picture to be displayed on IFP
Screen Wallpaper: (For active user) Assigns Wallpaper to be displayed on IFP
Favorite Applications: (For active user) Selects Favorite Applications to be displayed on IFP
Filter: Displays options for filtering the list of users on the Users Page.
USER ROLES
There are two types of user roles in AMS in terms of the privileges that users have. In AMS, each user is assigned to either of these two. User role selection is made during the user addition phase. Afterwards, the “Edit” menu in the user line menu is used to edit the user role. User roles are:
Super Admin: Super Admins can access all pages and content available in AMS. The user created during the AMS installation is a Super Admin.
User: Users can only access Users and About page. In addition, he cannot view other users and can only perform his own actions.
ADD USER
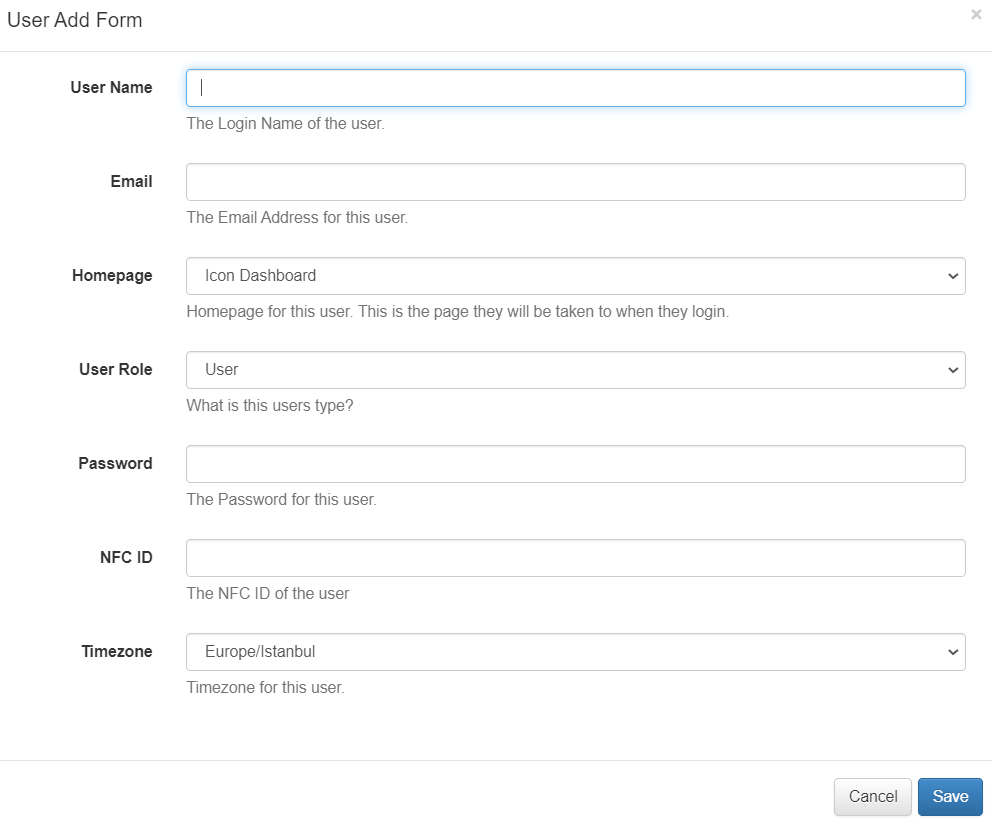
The Add User form is accessed through the “Add User” menu in the action menu located at the upper right corner of the Users page. Only Super Admins can do this action.
Add User Form
User form has editable fields for the following properties.
Username: Username for log in
Email: The user’s email address.
Home Page: Status or Icon Dashboard
User Role: User role (Super admin or User)
Password: User password for login
NFC Id: NFC ID used for the user to log in with an NFC card on the IFP
Time Zone: Indicates the time zone in which the date and time information displayed on the AMS
EDIT USER PROPERTIES
The Edit User form is accessed via the “Edit” menu in the row menu of the user whose information in the table on the Users page is desired to be edited. Only super admin can access this menu.
Edit User Form
The Edit User form contains editable fields for the following properties.
Username: Username for log in
Email: The user’s email address.
Home Page: Status or Icon Dashboard
User Role: User role (Super admin or User)
NFC Id: NFC ID used for the user to log in with an NFC card on the IFP
Time Zone: Indicates the time zone in which the date and time information displayed on the AMS
DELETE USER
To delete a user, click the “Delete” menu in the row menu of the user in the table on the Users page. The deletion process is completed with a confirmation form. Only super admin can do this operation.
All users can be deleted except the Super Admin that was created first during AMS installation.
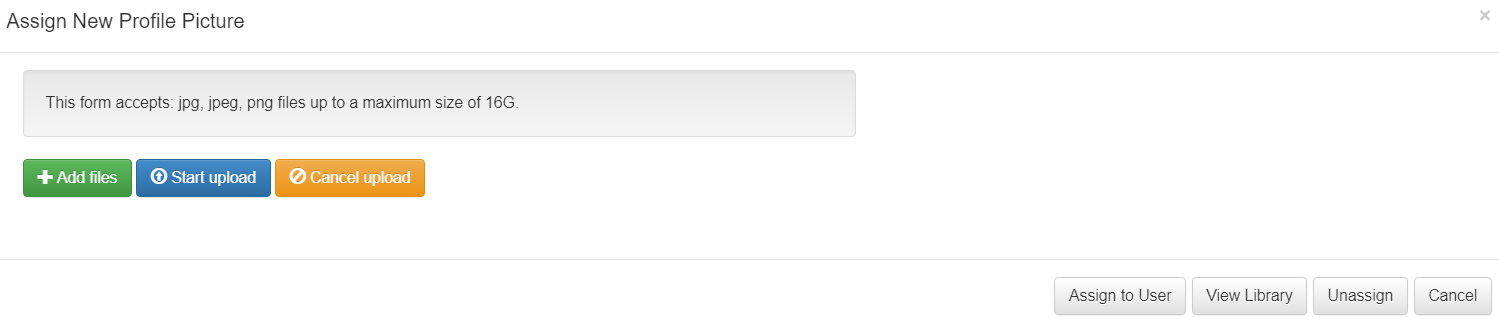
ADD PROFILE PICTURE
The profile picture for the user can be added, changed or removed. This profile picture is the user profile picture shown on IFP.
To edit the profile picture of the active logged in user, the My Profile Picture menu in the action menu located at the upper right corner of the Users page is used. To edit another user’s profile picture, the Profile Picture menu in the user row menu is used. As a result, the Add New Profile Picture form opens.
Add Profile Picture Form
With this form, the current profile picture can be removed. It is done by clicking Delete Assignment on the form.
Adding or changing a profile picture with this form can be done in two ways.
Method 1: By selecting the image from the local file selection
Click Add File in the form and select the file
Click Start Upload and thus the image will be added to the library
When the installation is complete, click Assign User
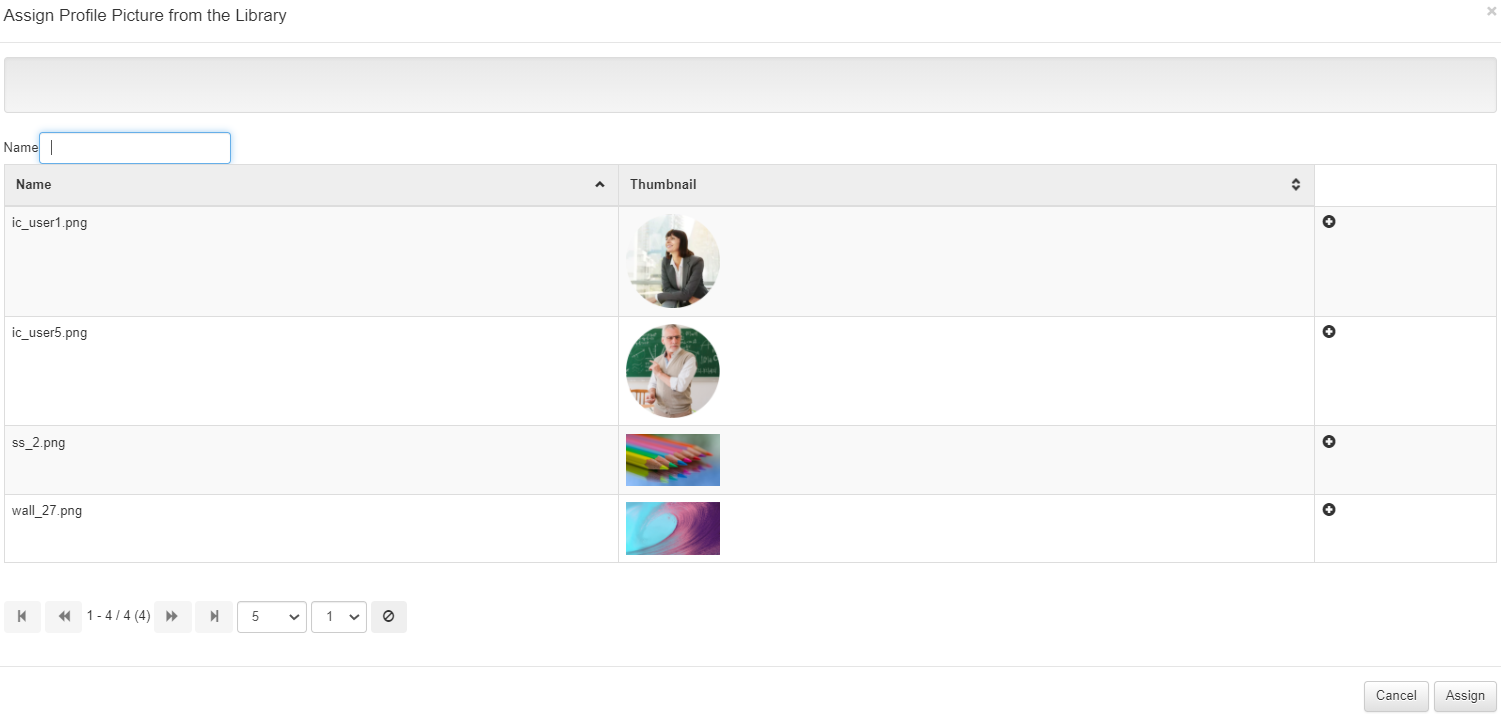
Method 2: By selecting the image from the library
Click on Show Library in the form.
The desired picture is found in the list and the + icon at the end of the line is clicked. The assigned image is added to the area at the top. In order to change the picture, it can be removed by clicking the – icon next to the added picture at the top and can be selected from the list again
When the desired image is selected, Allocate is clicked and the process is completed
Add Profile Picture From Library
ADD WALLPAPER
With AMS, the user can add, change or remove the wallpaper to be displayed on IFP.
To edit the screen wallpaper of the active logged in user, the My Screen Wallpaper menu in the action menu located at the upper right corner of the Users page. To edit another user’s screen wallpaper, the Wallpaper menu in the user row menu is used. As a result, the Add New Screen Wallpaper form opens.
Add Wallpaper Form
Existing screen wallpaper can be removed with this form. It is done by clicking Delete Assignment on the form.
Adding or changing a profile picture with this form can be done in two ways.
Method 1: By selecting the image from the local file selection
Click Add File in the form and select the file.
Click Start Upload and thus the image will be added to the library.
When the installation is complete, click Assign User.
Method 2: By selecting the image from the library
Click on Show Library in the form
The desired picture is found in the list and the + icon at the end of the line is clicked. The assigned image is added to the area at the top. In order to change the picture, it can be removed by clicking the – icon next to the added picture at the top and can be selected from the list again
When the desired image is selected, Assign is clicked and the process is completed
Add Wallpaper from Library
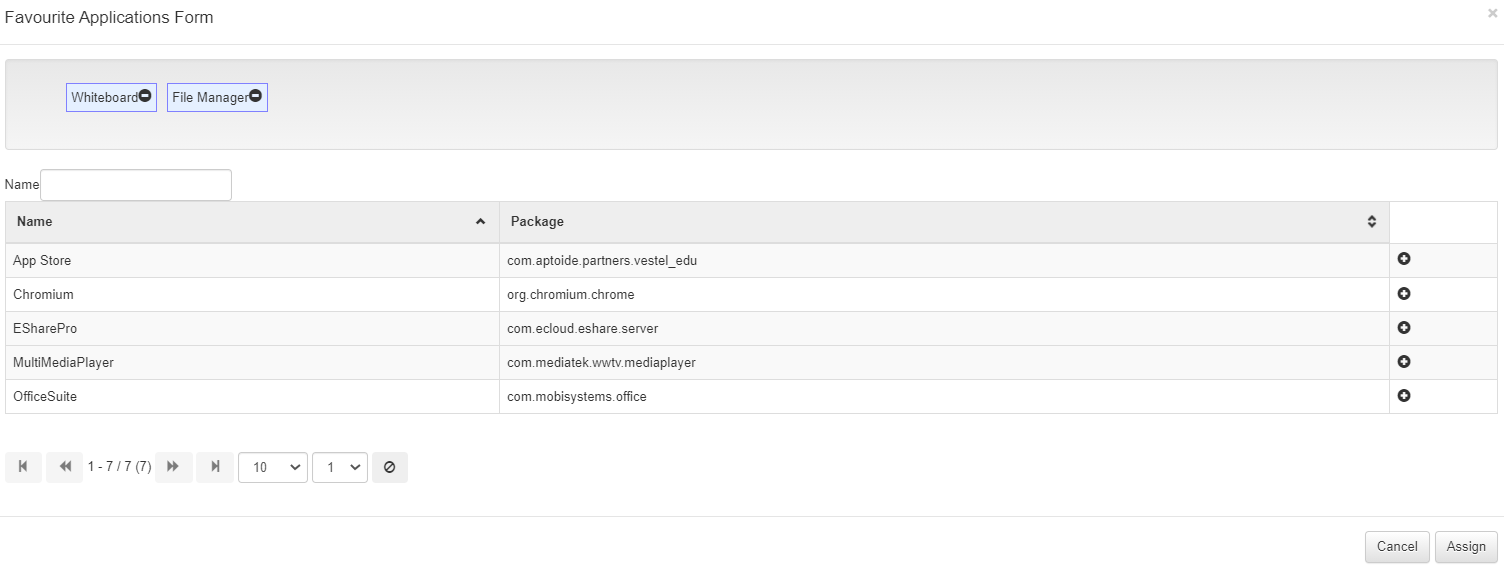
FAVORITE APPS
The favorite applications can be selected to be displayed on IFP.
The My Favorite Apps menu in the action menu located at the upper right corner of the Users or Applications page is used to organize the favorite applications of the active logged in user. To set another user’s favorite applications, the Favorite Applications menu located in the user row menu on the Users page is used. As a result of these actions, the Favorite Applications Form opens.
Favorite Apps Form
To select favorite apps:
The desired app is found in the list and and the + icon at the end of the row is clicked. Assigned applications are added to the area at the top of the form. In order to remove the assigned applications in the upper section, they can be removed by clicking the – icon next to the application name.
When applications are selected, Assign button is clicked and the process is completed
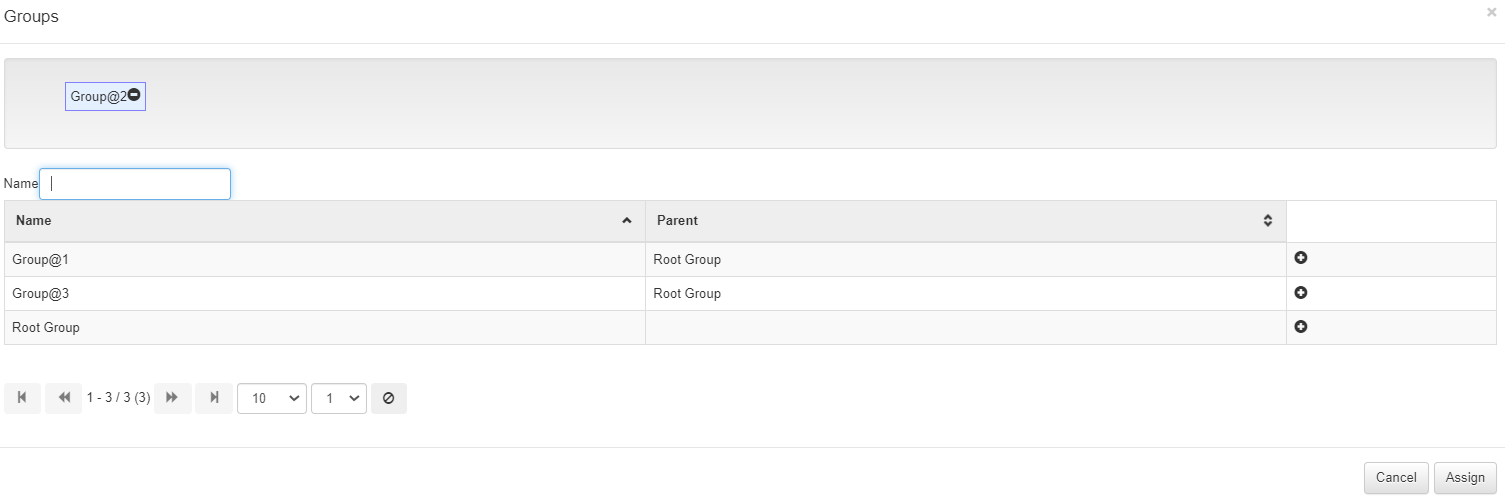
ASSIGN USER TO GROUP
In order to assign the user to one or more Groups, the “Groups” menu in the row menu of the user is clicked in the table on the Users page and the Groups form is opened.
Assign User to Group
To assign user to group:
The desired group is found in the list and and the + icon at the end of the row is clicked. Assigned groups are added to the area at the top of the form. In order to remove the assigned groups in the upper section, they can be removed by clicking the – icon next to the group name.
After groups are selected, Assign button is clicked and the process is completed
SET USER PASSWORD
The active user’s password or another user’s password can be changed.
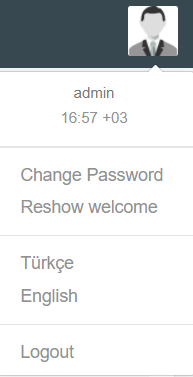
In order for the logged in active user to change the password, the user icon in the upper right corner is clicked and the Active User Menu opens.
User Menu of Logged in User
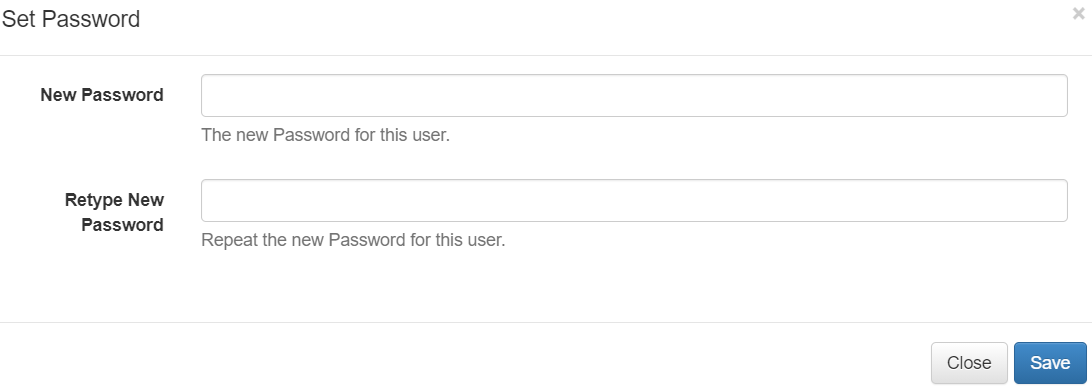
Click on Change Password from the menu above. If the old and new passwords are entered on the form and the old password is verified, the password is changed.
To change another user’s password, click the Password menu in the user row menu and the Set Password Form below opens. The process is completed by entering a new password on this form. Only super admin users can do this action.
Set Password Form
SET SCREEN LOCK PASSWORD
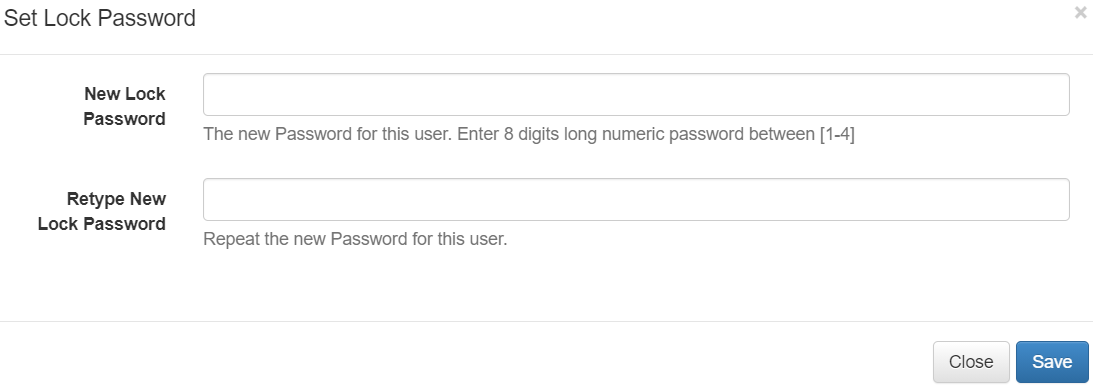
The logged in or another user’s lock password can be changed. Only super admin users can change other user’s screen lock password. This password is used to unlock screen on IFP. In locked mode, IFP features cannot be used.
Click the Lock Password menu in the user row menu and the Set Lock Password Form below opens. The process is completed by entering a new password on this form.
Set Lock Password Form
DISPLAYS
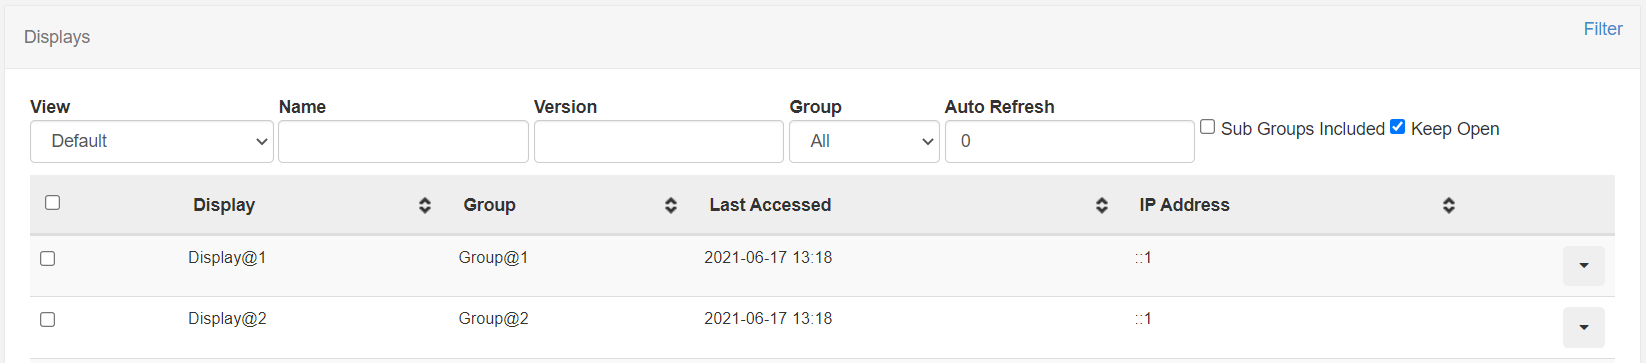
The list of IFPs registered to the AMS is displayed on the Displays page. Only Super Admin users can view this page.
Display is connected to the AMS via the screen where the AMS URL and AMS Key are entered on the IFP. At this stage, a unique hardware key is created for the display and as a result defined with this unique key on the AMS.
The Displays page is accessed via the Displays tab in the AMS navigation menu.
Displays Page
There are following columns in the table:
ID: Internal ID of the screen
Display: The name of the display
Group: The Group that the Display is being a member of
Last Accessed: Date/time of the last access
IP Address: The IP address where the display last reported its status
Version: Home Launcher version information
Description: Optional entered definition for the Display
FILTER DISPLAYS
The Display list can be filtered on the Displays Page. To filter the displays, the “Filter” menu in the Action Menu located at the upper right corner of the page is used. The filtering options are:
Appearance: Additional columns can be displayed in the Displays table with the selection made in the View list
Name: Filters by Display name.
Group: Filters by the Group that the Display is being a member of
Version: Filters by Launcher version of Display
Automatic Refresh: The frequency of automatic page refresh
Keep On: To keep filter options always visible on the page
DISPLAY ROW MENU
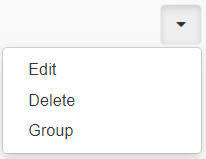
The operations that can be performed for each Display are accessed via the Row Menu at the end of the row. You can see an example row menu below.
Display Row Menu
The operations that can be performed via the Line Menu are:
Edit: Opens Edit Display form to set the Display options
Delete: Deletes the Display. However, even if the Display is deleted from AMS with this form, it can come back to the list when the Display is connected to AMS
Group: Selects Group that the screen is a member of
REGISTER DISPLAY
It is connected to the AMS via the screen where the AMS URL and AMS Secret Key will be entered on IFP. The AMS Secret Key is unique for each AMS and if entered correctly, the AMS will be registered.
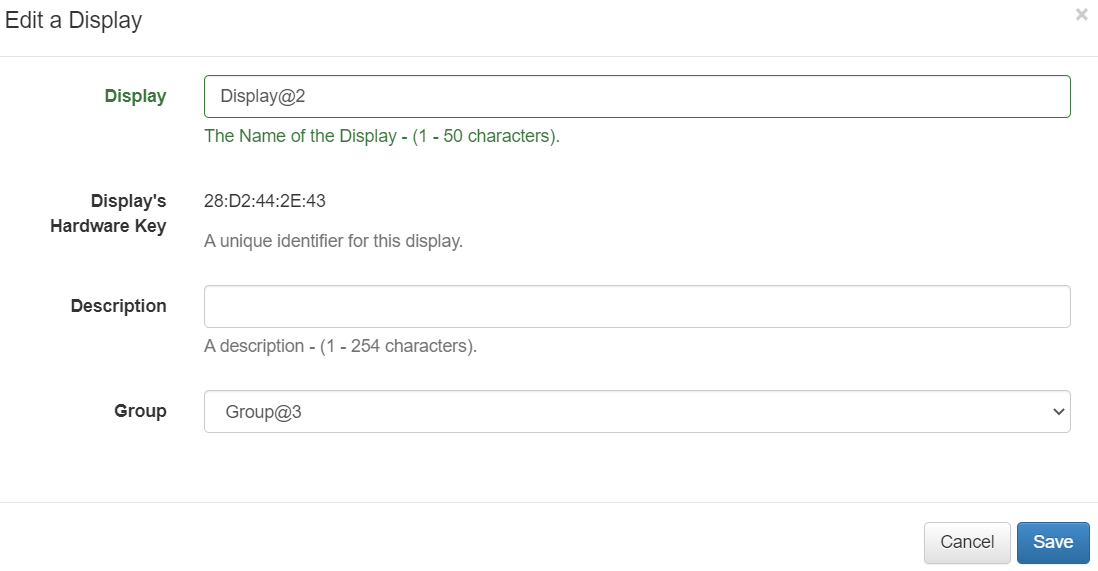
EDIT DISPLAY PROPERTIES
The Edit Display form is accessed via the “Edit” menu in the row menu of the Display in the table on the Displays page.
Edit Display Form
The Edit Display form contains editable fields for the following properties.
Display: The name of the display
Description: Optional description for the Display
Group: The Group that the Display is being a member of
Hardware Key: It is the unique key defined for Display in AMS. This field cannot be edite
DELETE DISPLAY
The Delete Display form is accessed via the “Delete” menu in the row menu of the Display in the table on the Displays page. If the Display will not be actively connected to the AMS, the deletion will be successful. But when the display is reconnected to AMS, it will be saved to AMS again and continue to be displayed in the list.
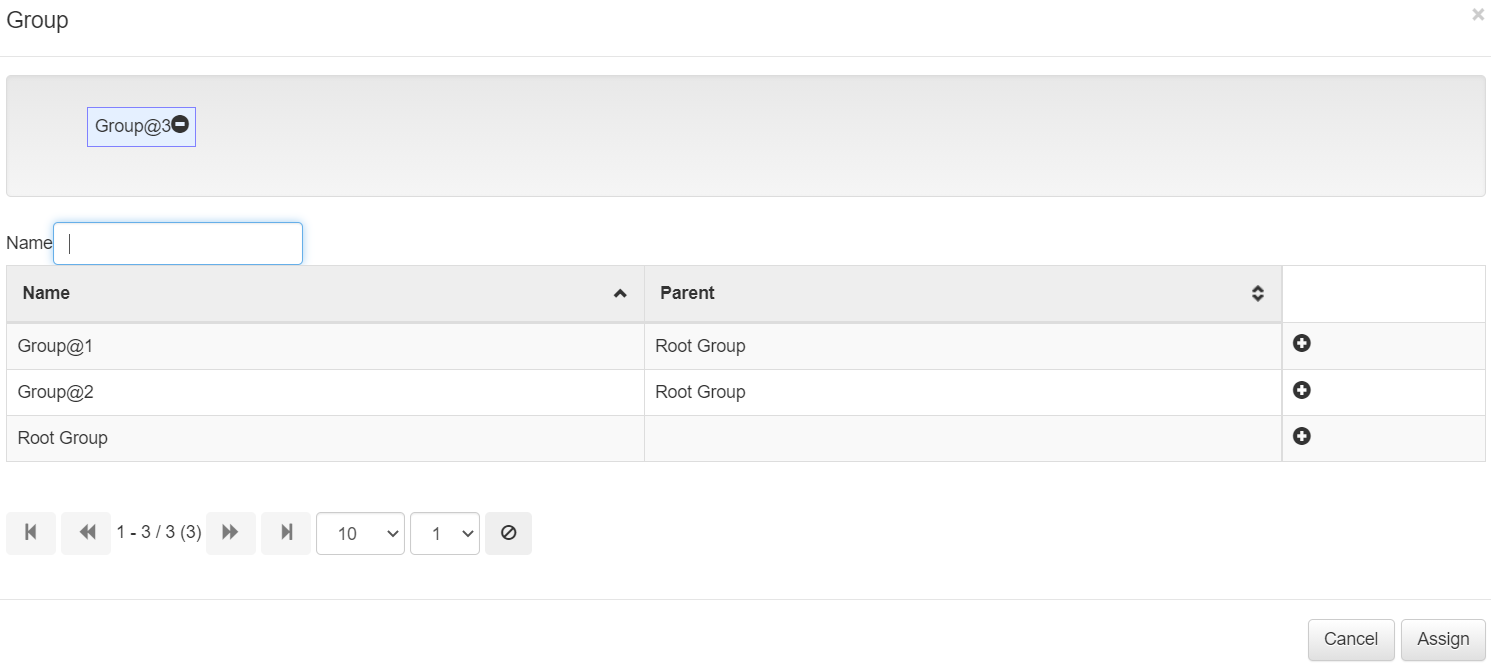
ASSIGN DISPLAY TO GROUP
This can be done with the Group option on the Display row menu. Each Displar can be assigned as a member of only one group.
Assign Display to Group
To assign Display to a Group:
The desired group is found in the list and and the + icon at the end of the row is clicked. Assigned group is added to the area at the top of the form. In order to remove the assigned group in the upper section, they can be removed by clicking the – icon next to the group name.
After the group is selected, Assign button is clicked and the process is completed
ADVANCED SETTINGS
It enables settings affecting the AMS via the Settings Page. The Settings page is accessed from the Settings menu in the Navigation menu.
The settings are divided into certain categories and presented in the form of tabs on the page. These categories are:
AMS Configuration: It provides basic configurations such as the library location where AMS server keeps the media files and setting the secret key required for IFPs to connect AMS.
Network: Allows proxy settings for the server
Regional: Sets the displayed language and date for the AMS. Turkish and English languages are supported only.
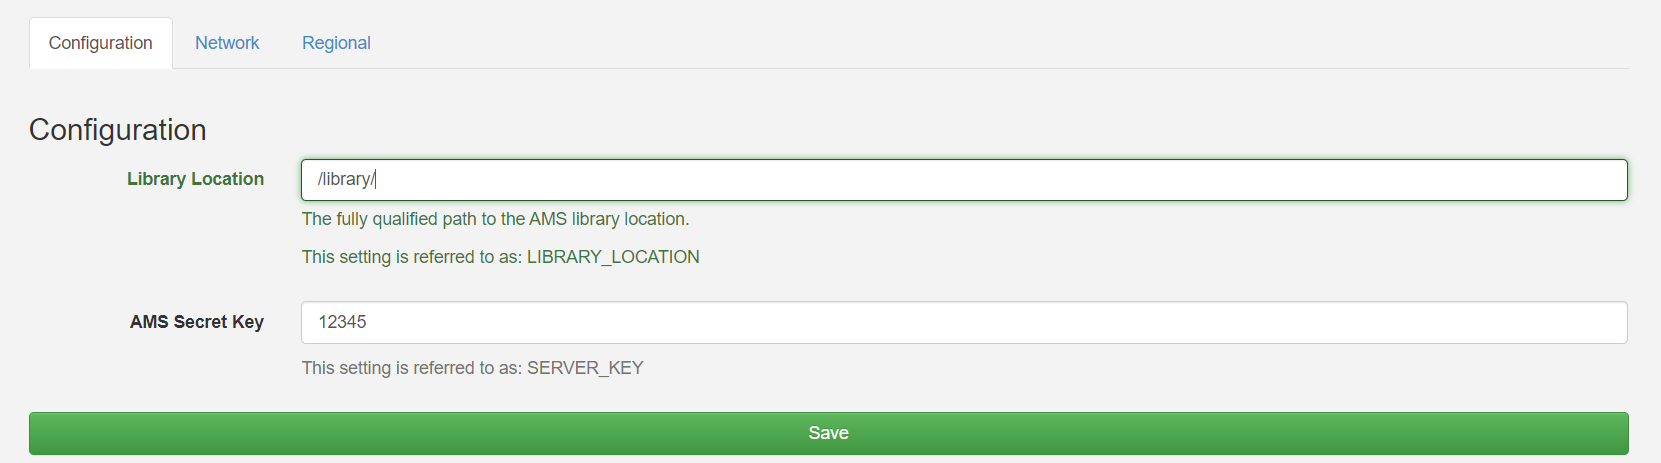
CONFIGURATION SETTINGS
The Configuration settings are accessed via the Configuration Tab exists in Settings Page. This is the page where the basic settings for the AMS server are made.
Settings Page – Configuration Tab
Configuration settings are:
Library Location: The library location where AMS server keeps the media files: profile pictures and wallpapers
AMS Secret Key: The key used by IFPs to connect AMS
After the settings are determined, click Save at the bottom of the page to save settings.
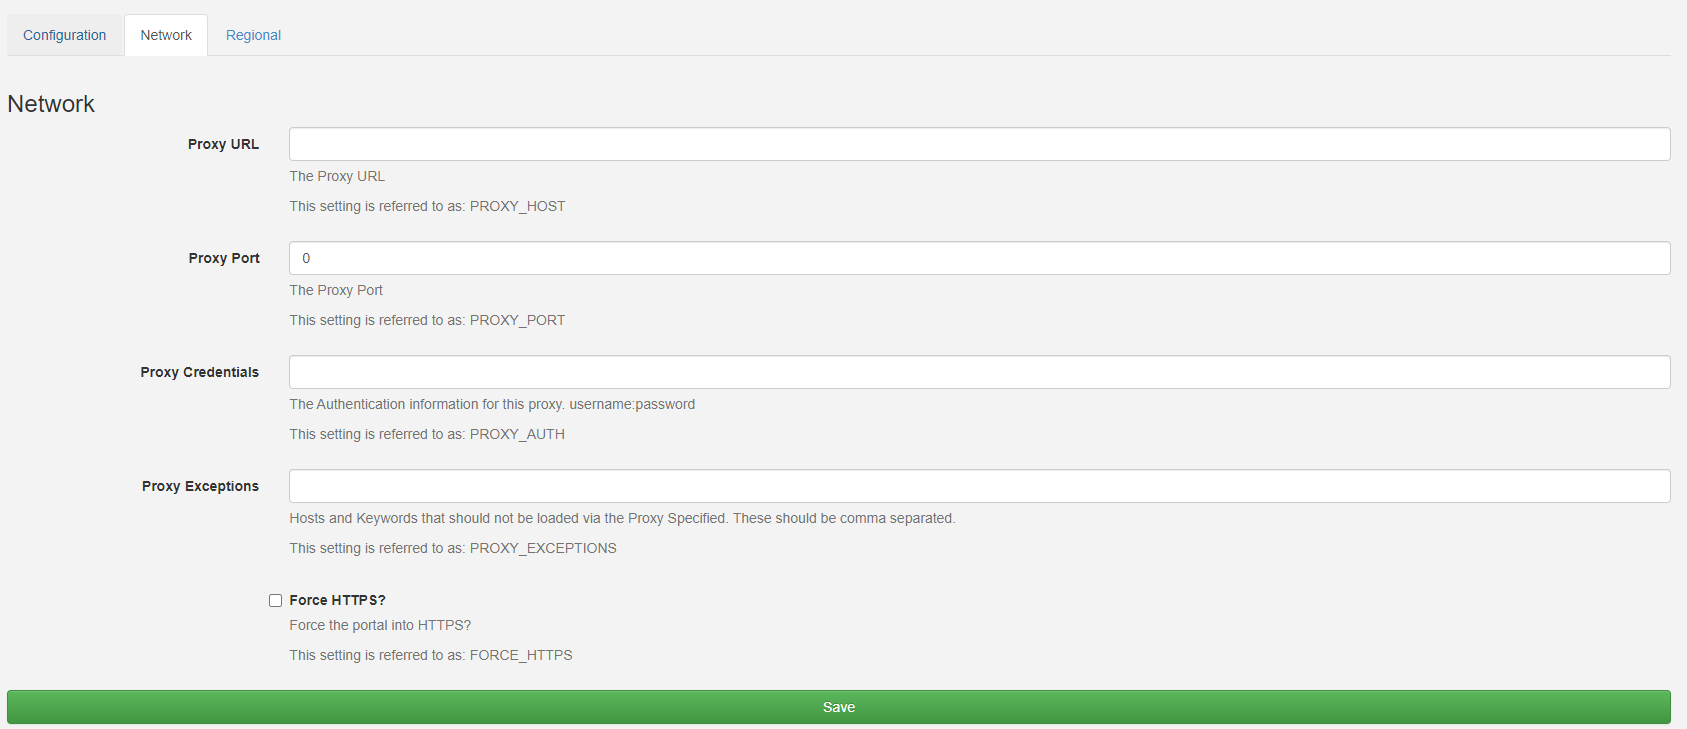
NETWORK SETTINGS
The Network settings are accessed via the Network Tab exists in Settings Page. This is the page where the basic network settings for the AMS server are made.
Settings Page – Network Tab
Configuration settings are below:
In case a Proxy Server is used:
Proxy URL
Proxy Port
Proxy Credentials
Proxy Port
If forcing AMS portal to HTTPS is required:
Force HTTPS
After the settings are determined, click Save at the bottom of the page to save settings.
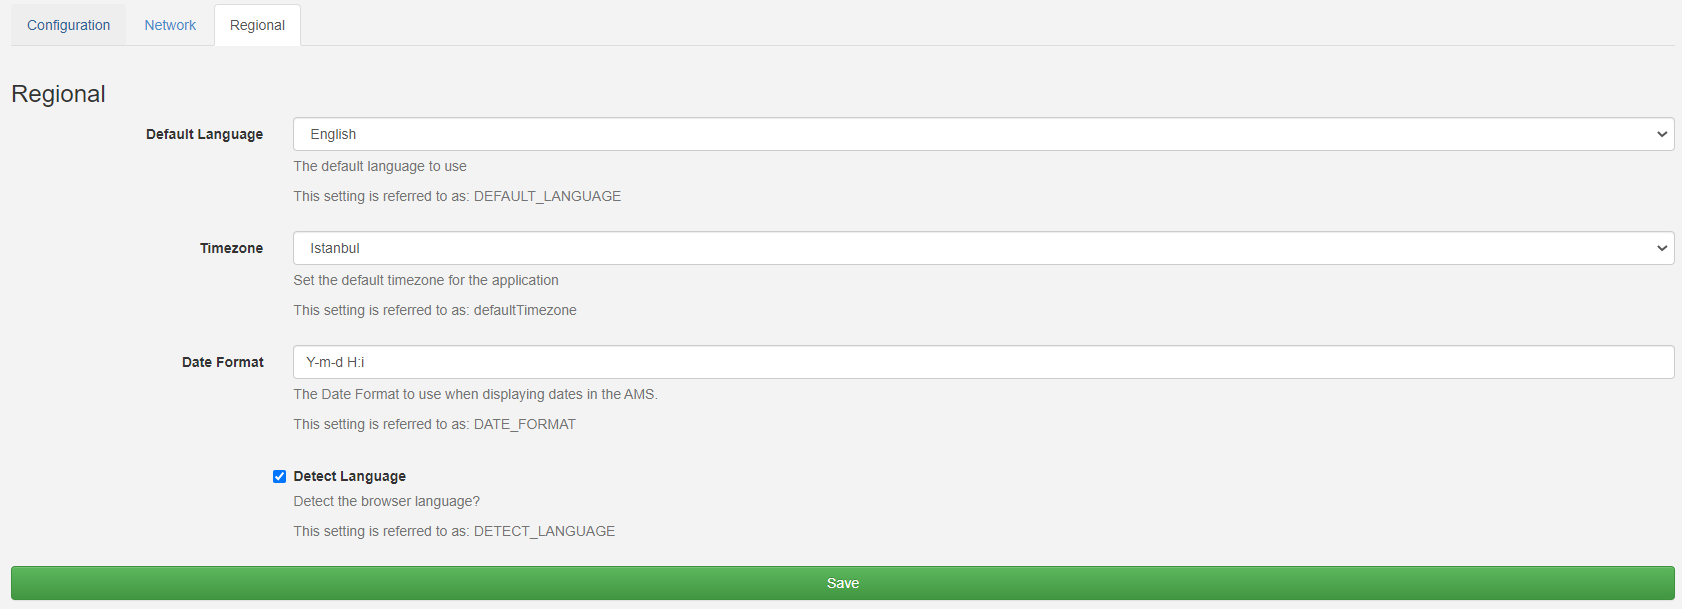
REGIONAL SETTINGS
The Regional settings are accessed via the Regional Tab exists in Settings Page. This is the page where the basic regional settings like Language and Timezone for the AMS server are made.
Settings Page – Regional Tab
Regional settings are
Default Language: The Language used in AMS portal (English or Turkish)
Timezone: Timezone used for date and time displayed on AMS portal
Date Format: Used for date and time displayed on AMS portal
Detect Language: AMS language is set to browser language for user
After the settings are determined, click Save at the bottom of the page to save settings.
ABOUT
The AMS was developed based on the Xibo software, which has the GNU Affero General Public License 3.0. You can access the related explanation from the About menu in the Navigation menu.